Easy Way to Keep Track of People I Contact
This chapter is from the book
Use the Contacts App to Keep Track of People You Know
Contact information related to the people in your life, as well as companies you do business with, can all be stored and easily managed using the Contacts app.
Your personal contacts database might include people you work with, customers, clients, family members, people from your community with whom you interact (doctors, hair stylist, barber, dry cleaners, and so on), your real-world friends, and your online friends from Facebook, for example.
You Determine What Information You Add to Each Contact Entry
Chances are, the same contacts database that you rely on at your office or on your personal computer at home can be synced with your iPhone or iPad and made available to you using the Contacts app.
Of course, Contacts can also be used as a standalone app, enabling you to enter new contact entries as you meet new people and need to keep track of details about them using your iOS mobile device(s).
The information you maintain in your Contacts database is highly customizable, which means you can keep track of only the information you want or need. For example, in each contact entry, it's possible to store a vast amount of information about a person or company, including multiple phone numbers, addresses, and email addresses. Each field is labeled for easy reference. For example, a Contact entry can include someone's home, work, and cell phone numbers.
You can also customize your contacts database to include additional information, such as each contact's photo, as well as detailed and freeform notes related to a contact.
When you're using the Contacts app, your entire contacts database is instantly searchable using data from any field within the database, so even if you have a database containing thousands of entries, you can always find the person or company you're looking for in a matter of seconds, using a wide range of search criteria. This can be done using the Search field in the Contacts app, using the Spotlight Search feature, or with Siri.
The Contacts App Works Seamlessly with Other Apps
After your contacts database has been populated with entries, Contacts works with many other apps on your iPhone and/or iPad. Here are just a few popular examples:
- When you compose a new email message in Mail, begin typing someone's full name or email address in the To field. If that person's contact information is already stored in Contacts, the relevant email address automatically displays in the email's To field.
- If you're planning a trip to visit a contact, pull up someone's address from your Contacts database and then quickly obtain driving directions to the person's home or work location from the Maps app.
- Activate Siri and request directions to any person or company with an entry stored in your Contacts database. For example, activate Siri and say, "How do I get to John Doe's house from here?"
- If you include each person's birthday in your Contacts database, that information can automatically be displayed in the Calendar app and be set up to remind you (in advance) to send a card or gift.
- As you're creating each Contacts entry, include a photo of that person—by activating the Camera app from the Contacts app to snap a photo, by using a photo stored in the Photos app that you link to the entry, or by acquiring profile photos from social media accounts. For example, to automatically insert profile photos of Facebook friends into the Contacts app, see the section "Add a Photo to a Contacts Entry" later in this chapter.
- When using FaceTime, create a Favorites list of people you often engage in video calls with, compiled from entries in your Contacts database.
- From the Messages app, access your Contacts database when filling in the To field as you compose new text messages to be sent via iMessage, text message, or instant message.
- If you're active on Facebook or Twitter, you have the option of adding each contact's Facebook and/or Twitter username to their Contacts entry. When you turn on the Facebook feature, the Contacts app automatically downloads each entry's Facebook profile picture and inserts it into your Contacts database.
When you first launch the Contacts app, its related database is empty. However, you can create and build your database in two ways:
- Sync the Contacts app with your primary contact management application on your computer, network, or online (cloud)-based service, such as iCloud or Microsoft Outlook.
- Manually enter contact information directly into the Contacts app.
As you begin using this app and come to rely on it, it's possible to enter new contact information or edit entries either on your iOS mobile device or using your primary contact management application and keep all the information synchronized, regardless of where the entry was created or modified.
How to View Your Contacts
On the iPhone, the All Contacts screen displays an alphabetical listing of all entries in your Contacts database. Along the right side of the screen are alphabetic tabs, and a Search field is located near the top of the screen.
On the iPad, in the middle of the screen are alphabetic tabs. The All Contacts heading is near the upper-left corner of the screen. Below it is a Search field. After you have added entries in your contacts database, they are listed alphabetically on the left side of the screen below the Search field.
On the iPhone, to see the complete listing for a particular entry, tap on its listing from the All Contacts screen. A new screen shows the specific contact's information (shown in Figure 13.9).

Figure 13.9 A sample contact entry from the Contacts app displayed on an iPhone.
On the iPad, to see the complete listing for a particular entry, tap on it from the All Contacts display on the left side of the screen. That entry's complete contents are then displayed on the right side of the screen.
To quickly find and display any contact in your Contacts database, activate Siri and say, "Find [name] within Contacts." The contact's information will be displayed as a Siri results screen, but the Contacts app will not automatically launch.
How to Create a New Contacts Entry
To create a new Contacts entry, tap the New Contact icon (which looks like a plus sign). On the iPhone, it's displayed in the upper-right corner of the All Contacts screen. On the iPad, the New Contact icon can be found near the top center of the Contacts app's screen.
After tapping on the New Contact icon, the New Contact screen appears.
In the New Contact screen are several empty fields related to the entry, starting with the First Name field (shown in Figure 13.10).
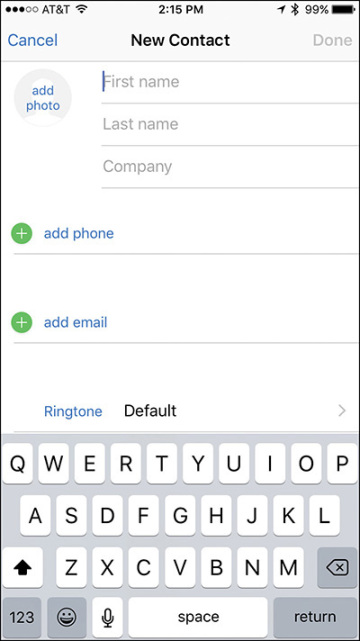
Figure 13.10 From this New Contact screen, create a new contact and include as much information pertaining to that person or company as you want.
Some fields, including Phone, Email, and Mailing Address, enable you to input multiple listings, one at a time. So you can include someone's home phone, work phone, and mobile phone (iPhone) numbers in the entry, for example. Likewise, you can include multiple email addresses, and/or a home address and work address for an individual.
At the bottom of the New Contact screen is the Add Field option. Tap it to reveal a menu containing a handful of additional fields you can add to individual Contacts entries as applicable, such as a middle name, job title, and/or nickname.
Each time you add a new mailing address to a contact's entry from within the New Contact screen, the Address field expands to include a Street, City, State, ZIP, and Country field.
After you have filled in all the fields for a particular entry, tap the Done option, which is displayed in the upper-right corner of the New Contact screen. Your new entry gets saved and added to your contacts database and is then synced with your other computers and/or mobile devices.
How to Add a Photo to a Contacts Entry
To the immediate left of the First Name field is a circle that says Add Photo. When you tap this field, a submenu with two options—Take Photo and Choose Photo—is displayed. If the entry already has a photo associated with it, the Edit Photo and Delete Photo options are also displayed.
Tap Take Photo to launch the Camera app from within the Contacts app and snap a photo to be linked to the Contacts entry you're creating. Alternatively, tap on the Choose Photo option. In this case, the Photos app launches so that you can choose any digital image that's currently stored on your iOS mobile device. When you tap the photo of your choice, a Choose a Photo window displays on the Contacts screen, enabling you to move and scale the image.
After cropping or adjusting the selected photo, tap the Use icon displayed in the upper-right corner of the Choose Photo window to link the photo with that contact's entry.
The photo you link with an entry is displayed by other apps, like Mail, Messages, and FaceTime, that utilize the Contacts app data.
Editing or Deleting a Contact
To edit a contact, tap on its listing from the All Contacts screen to display the contact details, and then tap on the Edit option displayed in the upper-right corner of the screen. Tap any field to modify it. Delete a field by tapping on the red-and-white minus sign icon associated with it, and then tap the Delete button that appears to the right of the entry.
You can also add new fields in an entry by tapping any of the green-and-white plus sign icons and then choosing the type of field you want to add.
When you're finished editing a Contacts entry, again tap the Done option.
Sharing Contact Entries
From the main All Contacts screen, tap on the contact listing you want to share. When the contact's entry is displayed, scroll down toward the bottom of the entry until you see the Share Contact option. Tap it. Then choose to share the contact's details with someone else via AirDrop, text/instant message (via the Message app), or email (via the Mail app).
The entire Contacts entry you selected (stored in .vcf format) will already be embedded in the outgoing email or text/instant message. When you've filled in all the necessary fields, tap the blue-and-white Send icon. Upon doing this, you are returned to the Contacts app.
When the recipient receives your email or message and clicks on the attachment (the contact entry you sent), it automatically is imported into their contact management application as a new entry, such as in the Contacts app running on a Mac, iPhone, or iPad.
Contacts App Quick Tips
- If someone shares a Contacts entry with you via email, when you're viewing the incoming email on your iPhone or iPad, tap the email's attachment. The Contacts entry that was emailed is displayed in a window. At the bottom of this window, as the recipient of the contact's information, tap the Create New Contact or Add to Existing Contact option to incorporate this information into your Contacts database.
- As you're creating or editing a contact entry, in the Notes field, enter as much information pertaining to that contact as you want using freeform text. It's also possible to paste content from another app into this field using the iOS's Select, Copy, and Paste commands, and using the app switcher to quickly switch between apps.
- When creating or editing contacts, it's important to associate the correct labels with phone numbers, email addresses, and address data. For each phone number you add to a contact's entry, for example, it can include a Home, Work, Mobile, iPhone, or Other label (among others). For many iOS 9 functions that utilize data from your Contacts database to work correctly (including Siri), it's important that you properly label content you add to each Contacts entry.
stevensonblene1993.blogspot.com
Source: https://www.informit.com/articles/article.aspx?p=2462883&seqNum=4
0 Response to "Easy Way to Keep Track of People I Contact"
Post a Comment